Adventurer_AD5M_AD5M Pro_Series Universal Camera
Adventurer_AD5M_AD5M Pro_Series Universal Camera
Product Introduction
Compatible Printers:
!!! attention
AD5M, AD5M Pro etc .(AD5X devices are not currently supported).
!!!
Assembly Steps
You can watch the assembly video.
You can also scan the QR code to view.
AD5M / AD5M Pro Usage Steps
Step 1
Install the camera according to the video instructions, then click on device settings.
Step 2
Click the camera
Step 3
Click the switch to enable the camera.
Step 4
Open the official Flashforge slicing software

Step 5
Select equipment
Step 6
Select your device
Step 7
Click to play
AD5X Usage Steps
!!! note Note
To use this camera, you must install the ZMOD firmware. For more information about ZMOD, please refer to Z-Mod - Firmware for AD5M / AD5MPro / AD5X.
!!!
You can also scan the QR code to view.
If the firmware version is already the latest, skip the first two steps and proceed directly to Step 3. For Steps 3-9, you can refer to the video guide at the assembly video.
Step 1
Upgrade the firmware to the latest version.
Step 2
Restart the machine's power supply to upgrade the MCU with the official firmware.
Step 3
Restore the printer to factory settings
Step 4
Format a USB drive to FAT32(A USB flash drive with a capacity of less than 16GB is required).
Step 5
Download the latest AD5X-zmod-*.tgz file, Copy the mod file to the USB root directory. The download link is System Firmware
Step 6
Power off the printer.
Step 7
Insert the USB drive.
Step 8
Power on the printer.
Step 9
Wait for the zmod installation to complete.
!!! warning Warning
- If the ZMOD installation process does not start after power on the device, please check whether the USB drive is connected correctly.
- Once the ZMOD firmware installation is complete, the device will automatically restart. You must follow the prompts displayed on the screen to complete the AD5X configuration before the device can function normally.
!!!
Step 10
!!! note Note
Before performing this step, please connect the camera's USB cable.
!!!
Open your browser, enter the AD5X's IP address into the address bar, and press Enter. Enter the command "CAMERA_ON VIDEO=video3" into the Console input box, After refreshing the page and the camera will display normally.
Attention
Refer to the assembly tutorial to avoid installation errors.
FAQ
- Q: How to install to my 3D printer?
A: You can watch the assembly video.
- Q:Does the installation require additional printed fixtures?
A:Not needed,If your printout is accidentally damaged, please click STL. to download.Or scan the QR code to download.
- Q:After the camera is installed, there is no camera button on the device in the second step.
A:Please check the ribbon cable behind your device's display for any creases or damage. Carefully smooth out any creases and check again to see if the device has a camera function.If you are still unable to enable it, we suggest you contact our customer service to purchase a replacement display screen connection cable.
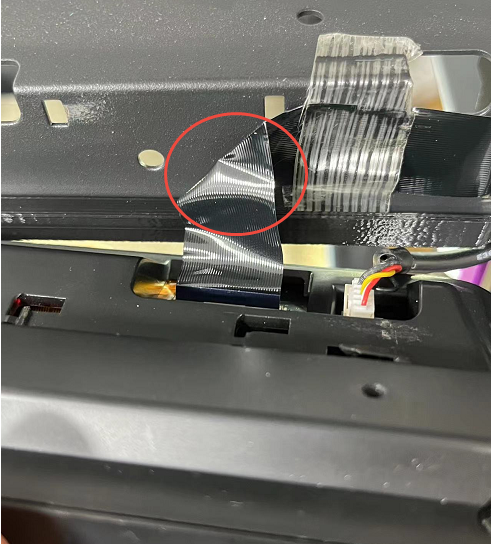
- Q:After installing the camera, the second step involves having a camera on the device, but it cannot be activated.
A:Please check the ribbon cable behind your device's display for any creases or damage. Carefully smooth out any creases.And try to enable the camera again.If you are still unable to enable it, we suggest you contact our customer service to purchase a replacement display screen connection cable. - Q:Why does the live stream automatically turn off after the camera is installed?
A:① Network latency and lag; ② Damaged display cable causing abnormal signal transmission.
Attachments
- STL.
Shop
Tech Support
facebook group:https://www.facebook.com/groups/197476557529090/
Tech Support Email: hunter@fysetc.com
Forum:https://forum.fysetc.com/
Updated on: 01/07/2026
Thank you!