Cheetah v2.0
Cheetah v2.0
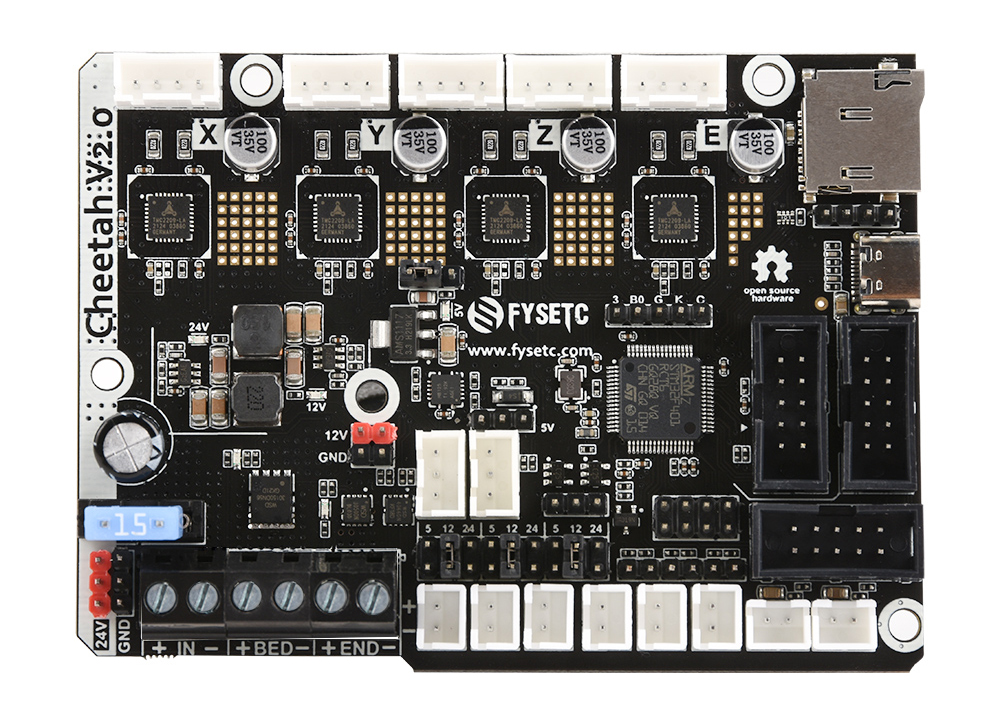
1. Product Introduction
Cheetah 2.0 is a single-head main control board based on STM32F401, with 4 TMC2209 onboard, supports sensor-less homing, can be connected to a variety of displays, compatible with the installation size of most of the Creality 3D machines, such as ender3, ender3 V2, ender3 pro, ender5, and is also suitable for general 3D printers DIY.
2. Features
- Compact size: 101.5mm x 72mm,Compatible with the Creatlity ender 3 motherboard size
- Fully integrated all in one solution:
- STM32F401MCU (Run Marlin 2.0/Klipper )
- 4X TMC2209 stepper drivers, Support sensor-less homing
- UNIVERSAL POWER:
- Can be used with 12V/24V for motors / heated bed
- 24V to 12V/2A DC-DC for fans
- Integrated high precision power regulators (DC/DC): 5V 2A Max and 3.3V 600mA Max LDO
- 12V&24V power pin out
- Onboard TF card socket- EXP3 for 12864 display panel (Creality 12864 panel or FYSETC Generic12864)
- EXP1&EXP2 RepRapDiscount SmartController compatible pin header on board
- EXP4 with I2C and UART1
- Onboard 5V WS2812 RGB control
- SD card & USB upload support
- Car fuses for main power input
- Up to 3 ways PWM fans (5/12/24 Optional)
- PCB: FR4-TG155 PCB - Gold ENIG finishing
3. Application
4. Hardware
4.1 Hardware Reasources
Board Name | Cheetah v2.0 |
|---|---|
License | GPL V2.0 |
Latest Version | V2.0 |
Extruders | 1 |
Controlled Fans | 3 Max |
Heaters | 2 Max |
Endstops | 3 Max |
Temp sens | 2 Max |
UART | 1 |
I2C | 1 |
SWD | 1 |
USB | 1 |
CPU | STM32F401 |
CPU Speed ( MHz ) | 84 Mhz |
Stepper driver | 4X TMC2209 |
Stepper driver Type | Onboard |
Input | 12v/24v |
Output | BED OUT:10A Max ;Heater Out:5A Max |
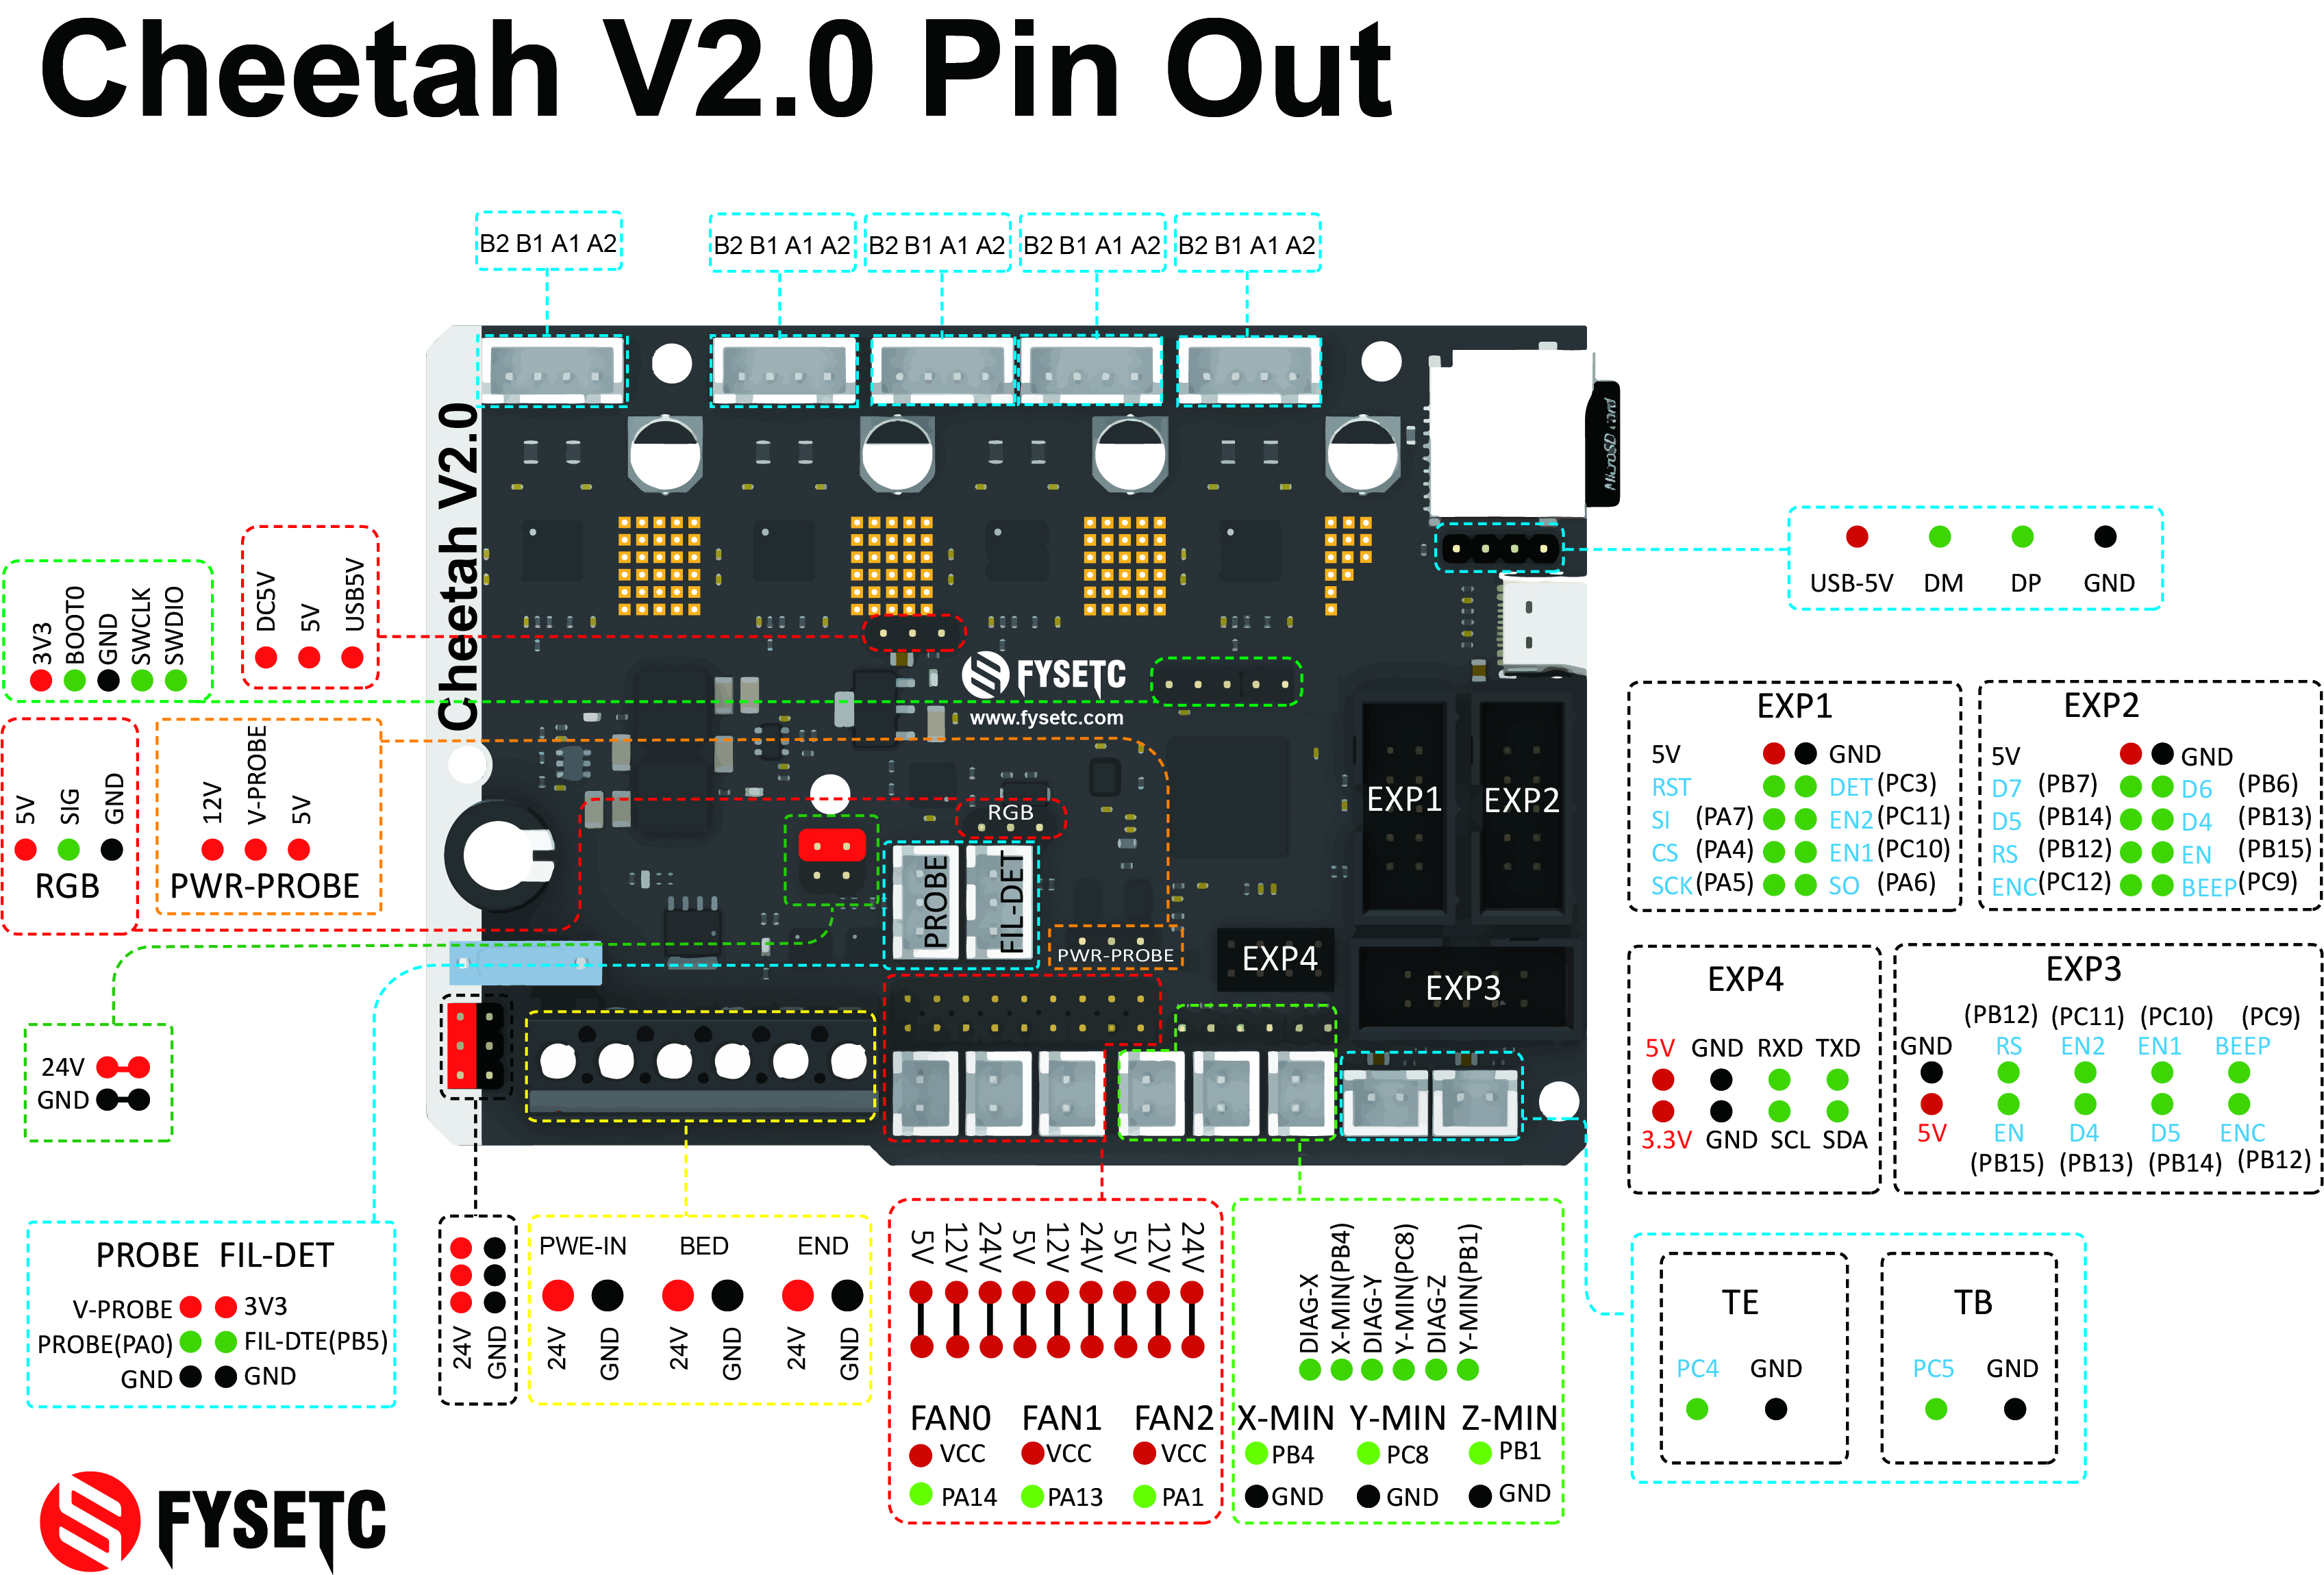
4.2 Connectors and jumpers define
Coming soon...
4.3 Pin Definition
Features | Cheetah Pin | STM32 Pin | Pin No. | Comment |
|---|---|---|---|---|
X-MOTOR(1) | X-Step | PC0 | 8 | |
X-MOTOR(1) | X-DIR | PC1 | 9 | |
X-MOTOR(1) | X-EN | PA8 | 41 | |
Y-MOTOR(2) | Y-Step | PC14 | 3 | |
Y-MOTOR(2) | Y-DIR | PC13 | 2 | |
Y-MOTOR(2) | Y-EN | PC15 | 4 | |
Z-MOTOR(3) | Z-Step | PB9 | 62 | |
Z-MOTOR(3) | Z-DIR | PB8 | 61 | |
Z-MOTOR(3) | Z-EN | PC2 | 10 | |
E0-MOTOR(4) | E0-Step | PB2 | 28 | |
E0-MOTOR(4) | E0-DIR | PA15 | 50 | |
E0-MOTOR(4) | E0-EN | PD2 | 54 | |
TMC2209 SERIAL (UART2) | TX2 | PA2 | 16 | |
TMC2209 SERIAL (UART2) | RX2 | PA3 | 17 | |
End-stops | X-MIN | PB4 | 56 | |
End-stops | Y-MIN | PC8 | 39 | |
End-stops | Z-MIN | PB1 | 27 | |
FAN | FAN0 | PA14 | 49 | |
FAN | FAN1 | PA13 | 46 | |
FAN | FAN2 | PA1 | 15 | |
RGB | Neo-pixel | PB0 | 26 | Can be used for fan4 |
Heating | E0-Heater | PC6 | 37 | |
Heating | Heated-Bed | PC7 | 38 | |
Temperature | TE0 | PC4 | 24 | |
Temperature | TB | PC5 | 25 | |
EXP1 | SD-MISO | PA6 | 22 | |
EXP1 | SD-SCK | PA5 | 21 | |
EXP1 | BTN_EN1 | PC10 | 51 | |
EXP1 | SD-SS | PA4 | 20 | |
EXP1 | BTN_EN2 | PC11 | 52 | |
EXP1 | SD-MOSI | PA7 | 23 | |
EXP1 | SD-DET | PC3 | 11 | |
EXP1 | RESET | NRST | 7 | |
EXP1 | GND | GND | NA | |
EXP1 | 5V | 5V | NA | |
EXP2 | BEEP | PC9 | 40 | |
EXP2 | BTN_ENC | PC12 | 53 | |
EXP2 | LCD_EN | PB15 | 36 | |
EXP2 | LCD_RS | PB12 | 33 | |
EXP2 | LCD_D4 | PB13 | 34 | |
EXP2 | LCD_D5 | PB14 | 35 | |
EXP2 | LCD_D6 | PB6 | 58 | |
EXP2 | LCD_D7 | PB7 | 59 | |
EXP2 | GND | GND | NA | |
EXP2 | 5V | 5V | NA | |
UART | TX | PA9/TX1 | 42 | |
UART | RX | PA10/RX1 | 43 | |
I2C | I2C2 SCL | PB10 | 29 | |
I2C | I2C2 SDA | PB11 | 30 | |
SWD Debug | SWDIO | PA13 | 46 | only used for debugging now and can be used for other purposes. |
SWD Debug | SWCLK | PA14 | 49 | only used for debugging now and can be used for other purposes. |
4.4 Wiring
4.4.1 Bltouch wiring
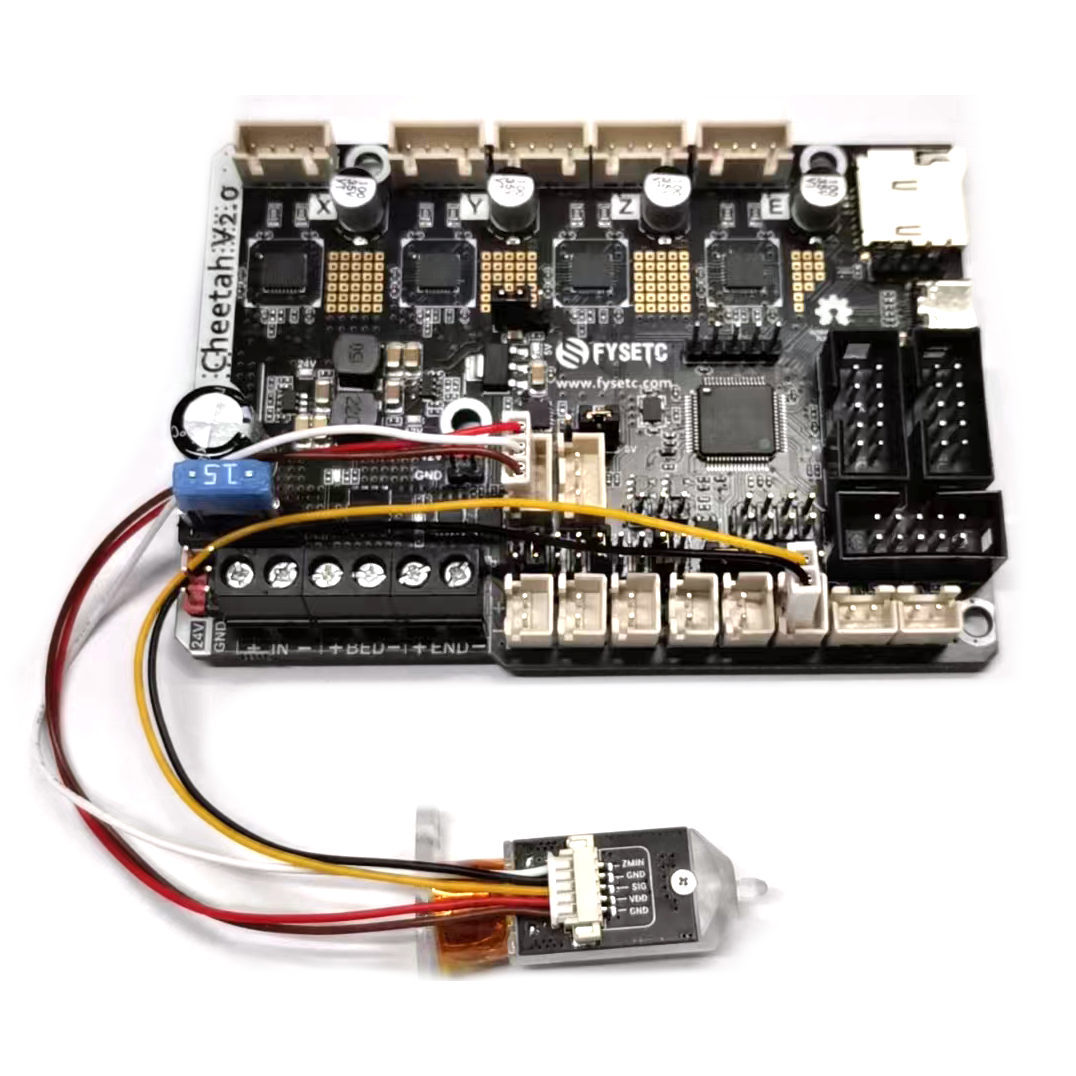
klipper config
[bltouch]
sensor_pin: ^PA0
control_pin: PB1
4.4.2 VORON 0.1 wiring
Please refer to our VORON 0.1 kit wiring here( github or 国内)
5. Firmware
5.1 Marlin
Follow the steps below to compile the firmware yourself. More information here.
5.1.1 Download Vscode + platformio
To compile the firmware , you need to install Visual Studio Code and the platformio pulg-in.
5.1.2 Firmware config
You have two code source choices
Source 1
You can get Marlin code is in the firmware/Marlin folder in this repository github or gitee.
Source 2
Also you can get upstream branch from github or gitee (You'd better use the bugfix-2.0.x version as i just make PR 2021/10/10, so Marlin group may not integrate the code in formal version). Remember to change default_envs in platformio.ini file.
default_envs = FYSETC_CHEETAH_V20And change MOTHERBOARD define according to your cheetah board version in Configuration.h
#define MOTHERBOARD BOARD_FYSETC_CHEETAH_V20And serial port
#define SERIAL_PORT -1
#define BAUDRATE 115200
Change configuration
You need to modify your configuration.h and configuration_adv.h according to your machine. Then you can compile the firmware.
5.1.3 Compile the firmware
Open Vscode and open platformio main page and click the "Open Project" button , and direct to the folder where you put your firmware.
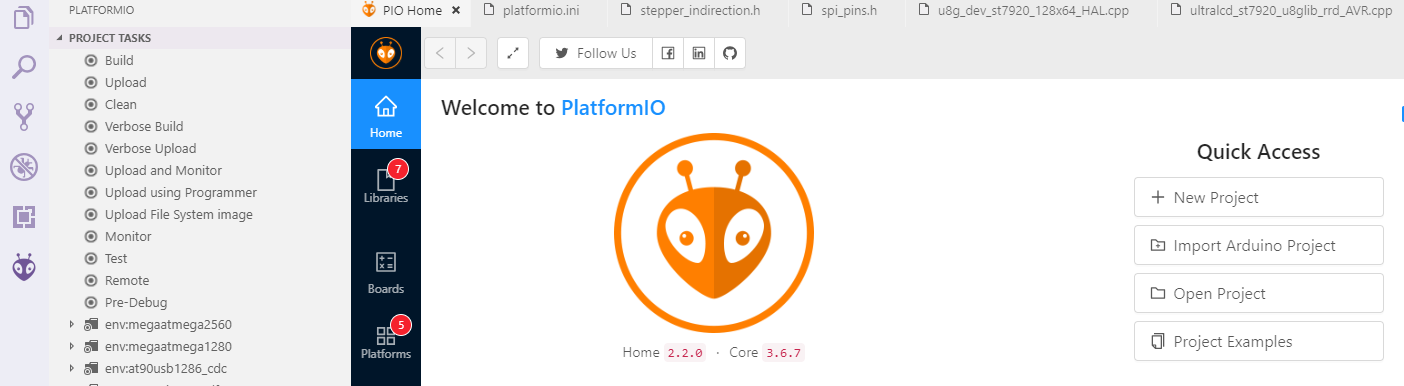
If everything goes fine , at the bottom you can see several buttons

Just click check mark to compile.
5.1.4 Upload the firmware
Follow the instruction here.
5.2 Klipper
Till now(2021/11/30), Klipper don't have boot offset setting for STM32F401 chip, so we use no Bootloader option first. (If you want still want to use Cheetah bootloader, you can change the code following the PR here, then use 32KiB bootloader option).
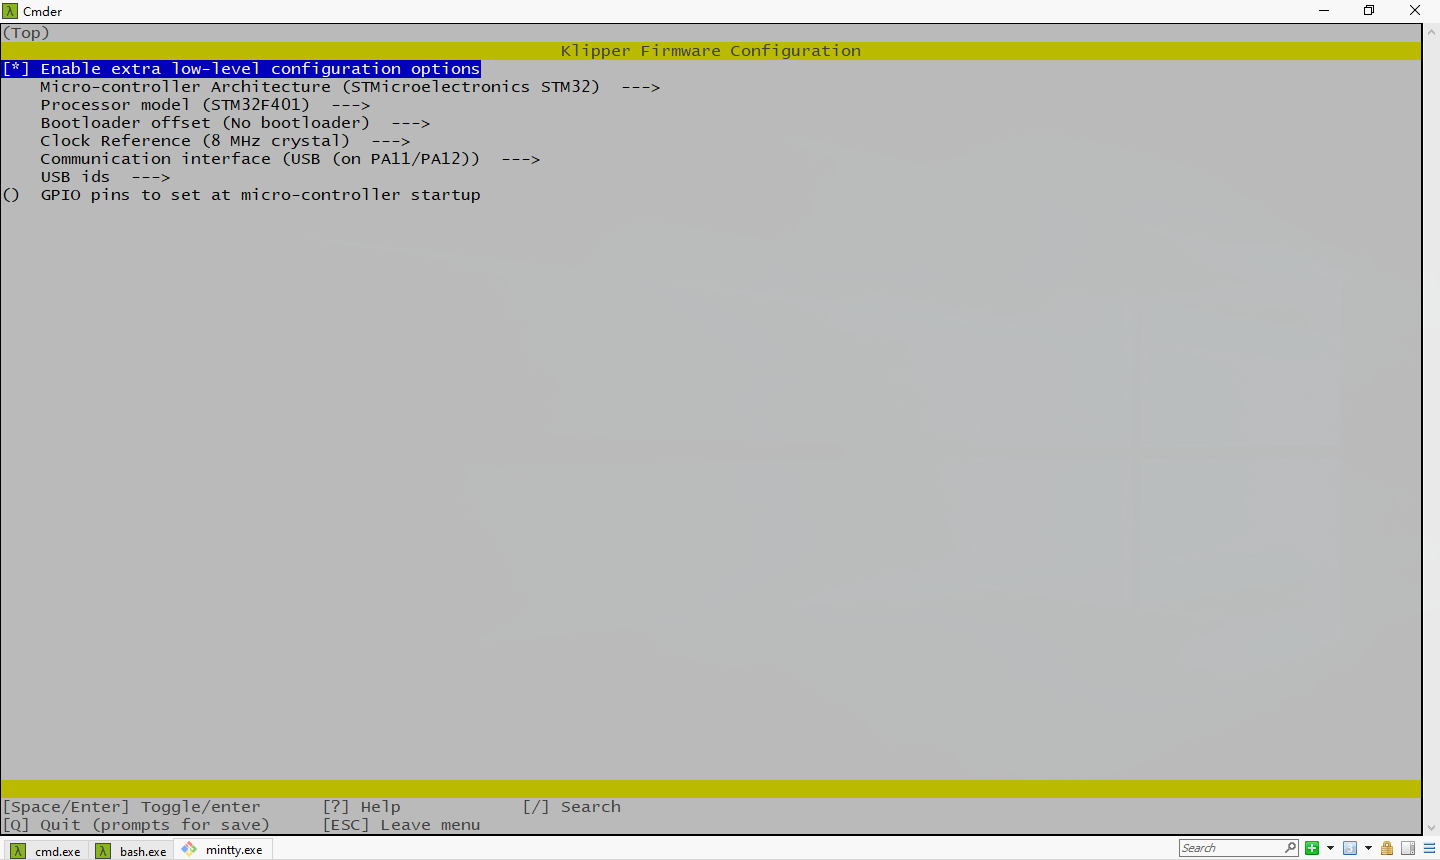
make clean
make
Then follow the Firmware Upload section instruction below to upload the firmware.
I made the PR for Klipper of Cheetah v2.0 config, you can check it here.
5.3 Firmware Upload
We provide several ways to upload the firmware.
5.3.1 Upload the firmware(SDCARD)
If you use Klipper firmware with No bootloader option, you can't use this method. This method only works with bootloader.
Uploading firmware using SD card is our default way to update the firmware as Cheetah v2.0 already has the bootloader on it when it leave the factory. But if you once upload the firmware to Cheetah v2.0 flash address 0x08000000, then the bootloader in Cheetah v2.0 will be gone, then you need to upload the bootloader to Cheetah v2.0 yourself, please follow the README in bootloader folder (github or gitee) to upload the bootloader.
How to upload firmware with bootloader
Copy your compiled firmware file firmware.bin(If you use klipper firmware, you need to rename klipper.bin to firmware.bin) file to the SD card , and insert it to the SD card slot which is at the right side of the board, and then power up the board. You may need to wait for about 30s to finish uploading. When finished firmware name will change to old.bin.
5.3.2 Upload the firmware(dfu-util)
This method works in linux, that means should work in raspberry pi.
- Enter DFU mode first
- First power off the board
- Place jumper on BT0 and 3.3V pin
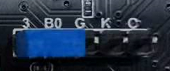
- Connect USB cable to the board and your computer
- Power up the board with 24v
- Make sure dfu-util is installed, shoot
dfu-util --versioncommand to check.
Sample output:
dfu-util 0.9

   Copyright 2005-2009 Weston Schmidt, Harald Welte and OpenMoko Inc.
   Copyright 2010-2016 Tormod Volden and Stefan Schmidt
   This program is Free Software and has ABSOLUTELY NO WARRANTY
   Please report bugs to http://sourceforge.net/p/dfu-util/tickets/
If not , you should install it first, use the package manager of your distribution to get the latest version, like
sudo apt-get install dfu-util- Then use the command below to upload the firmware. You should replace
firmware.binbelow with your built firmware bin file location likeout/klipper.bin. Change flash address0x08008000to bootloader you choosed. (If you use Marlin firmware, you need to set it to0x08008000. If you use klipper firmware and you choose boot address32kiB bootloader(decribe here) when compiling klipper then set it0x08008000, ifno Bootloader, set it0x08000000.)
dfu-util -R -a 0 -s 0x08008000:leave -D firmware.bin- Remove boot jumper and power-off then power on the board.
5.3.3 Upload the firmware(WINDOWS DFU)
The other way to upload the firmware is using DFU.
Step 1. Download stm32cubeprogrammer
You can download it from ST website.
https://www.st.com/zh/development-tools/stm32cubeprog.html
Open the STM32CubeProgrammer software.
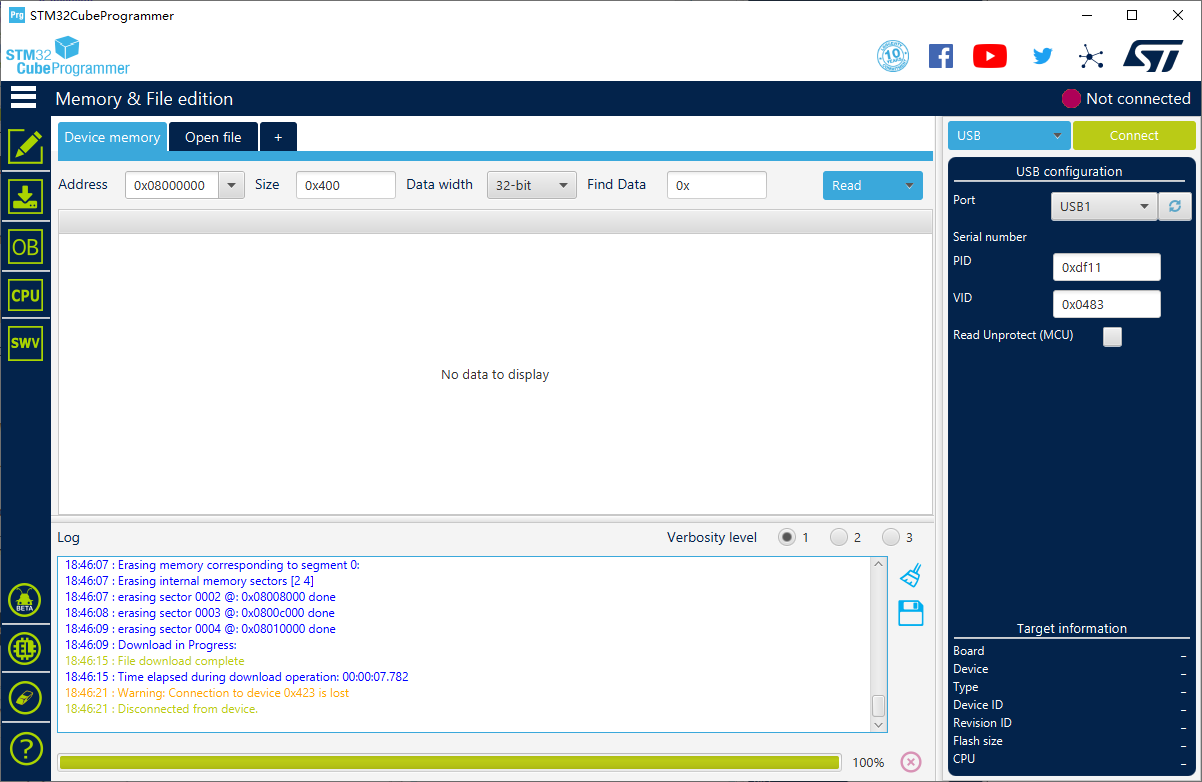
Step 2. Enter DFU mode
- First power off the board
- Place jumper on BT0 and 3.3V pin
- Connect USB cable to the board and your computer
- Power up the board with 24v
Now the board is in DFU mode.
REMEMBER to remove the jumper if you finish uploading firmware or it will enter DFU mode again.
Step 3. Upload the firmware
Now you can connect and flash the Cheetah board with stm32cubeprogrammer with the following operation.
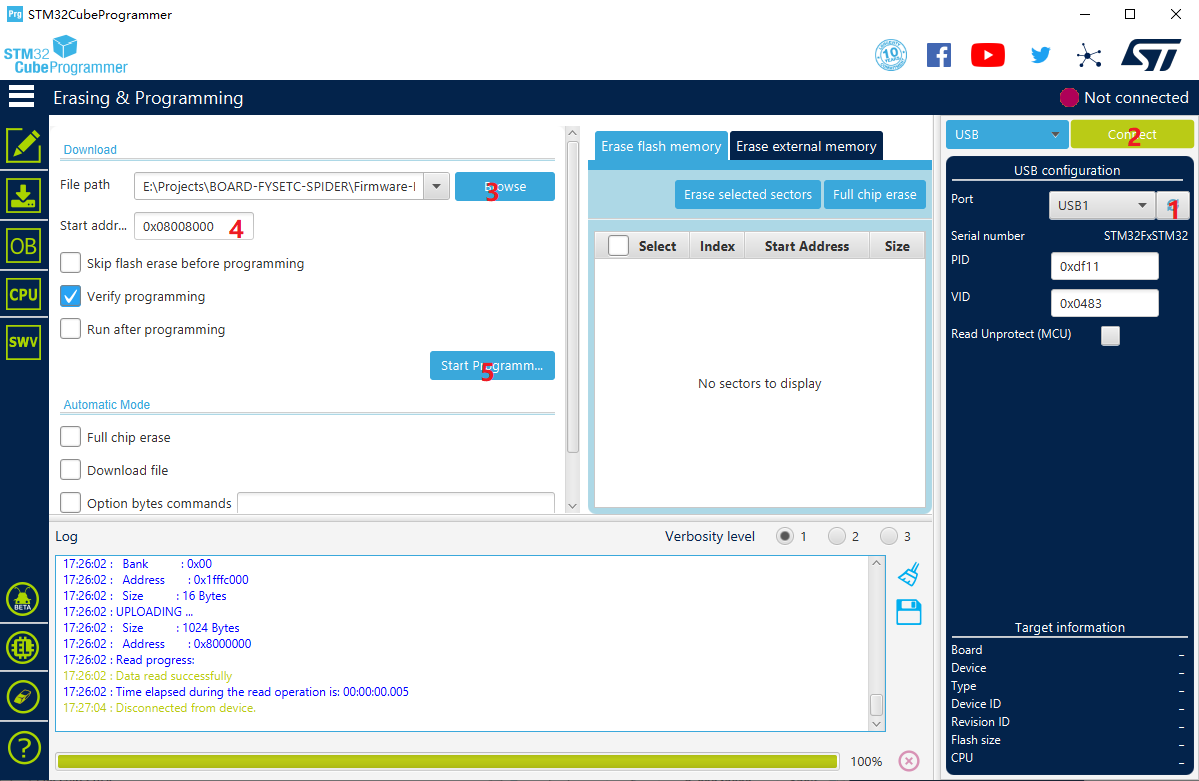
Do as the red number shows in the screen shot.
- Click the button to find the DFU port.
- Connect the DFU
- Choose the "firmware.bin" file.
- If your firmware is
.hexfile, skip this step. Fill in the 'Start address' with (If you use Marlin, set it0x08008000. If you use Klipper firmware and you choose boot address32kiB bootloader(decribe here) when compiling klipper then set it0x08008000, ifno Bootloader, set it0x08000000.) - Start Programming
- Remove boot jumper and power-off then power on the board.
5.3.4 Upload firmware(platformio)
If you compile Marlin yourself with platformio,you can follow the instructions below to upload the firmware.
Step 1. Enter DFU mode first
- First power off the board
- Place jumper on BT0 and 3.3V pin
- Connect USB cable to the board and your computer
- Power up the board with 24v
Step 2. Click the upload button to upload firmware

6. FAQ
1.How to config Ender 12864 on klipper?
Refer to the pinout pic and klipper documents:
[display]
lcd_type: st7920
#   Set to "st7920" for st7920 displays.
cs_pin: PB12
sclk_pin: PB13
sid_pin: PB15
#   The pins connected to an st7920 type lcd. These parameters must be
#   provided.
encoder_pins: PC10,PC11
click_pin: PB12
7. Tech Support
Please submit any technical issue into our forum
Updated on: 03/08/2026
Thank you!