AIO_II
Sorry, this page is being writed, and there is still some content waiting to be conpleted. Please be patient!
Product Introduction
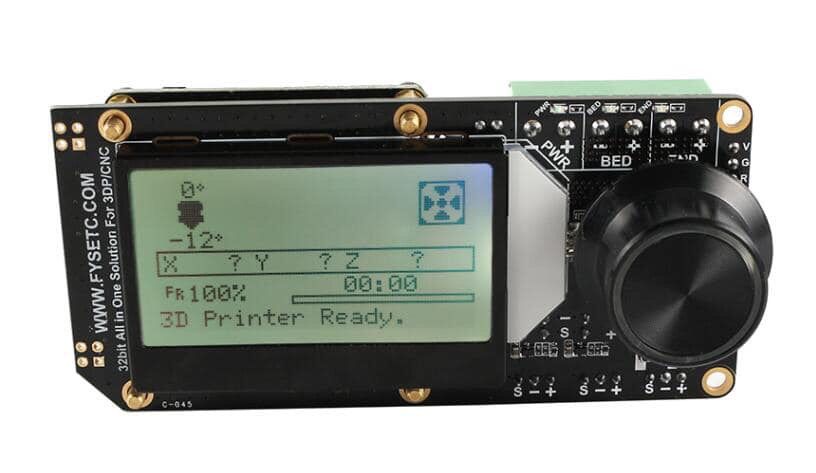
This is an All In One (So we call it AIO) solution with 32-bit MCU and 256-microsteps stepper motor drive for 3DP/CNC or similar machine.It has everything you need to assemble a 3DP, including a display and an SD card holder.
Features
- Compact size: 105mm x 50mm
- fully integrated all in one solution:
- STM32F103 MCU (Run Marlin 2.0 )
- CH340 for high speed USB serial connection and firmware upload
- 4X ST820 stepper drivers, 256 Microsteps
- UNIVERSAL POWER:
- can be used with 7V-35V for motors / heated bed
- integrated high precision power regulators (DC/DC): 5V 1A Max and 3.3V 600mA Max LDO
- Onboard SD card socket
- Onboard RGB mini12864 LCD
- Onboard RGB control
- Support firmware upload via USB or SD
- PCB:
- High quality, High temperature FR4-TG130 PCB
- Gold ENIG finishing
Application
- 3D printer
- CNC Machines
- Other similar machines
Hardware Reasources
Board Name | AIO II |
|---|---|
License | GPL V2.0 |
Latest Version | V1.0 |
Extruders | 1 |
Fixed Fans | 1 Max |
Controlled Fans | 1 Max |
Heaters | 2 Max |
Endstops | 3 Max, 3Pin XH header |
Temp sens | 2 Max |
I2C | 1 |
SWD | 1 |
Serial port chip | CH340 |
CPU | STM32F103 |
CPU Speed ( MHz ) | 72 Mhz |
Stepper driver | 4X ST820 |
Stepper driver Type | Modular, replaceable. |
Input | 7-35 V 15A Max; |
Output | BED OUT:10A Max ;Heater Out:5A Max |
Pin Definition
Connector define:
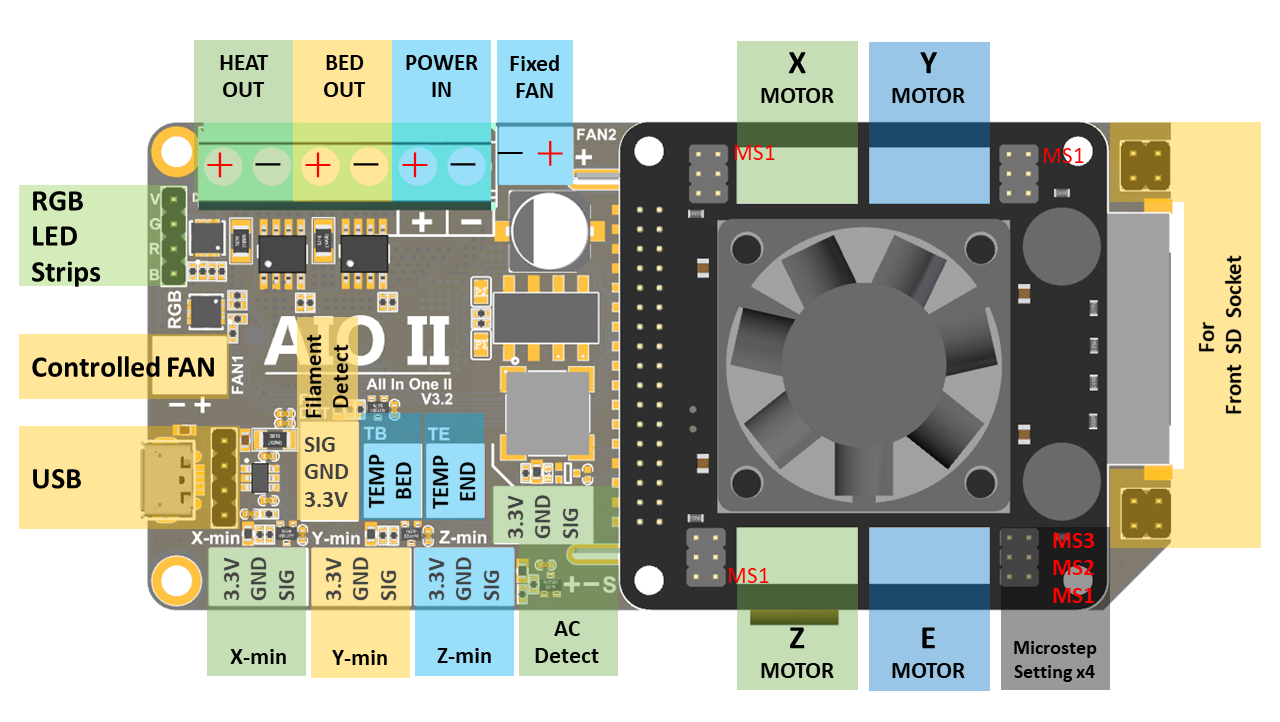
microsteps setting:
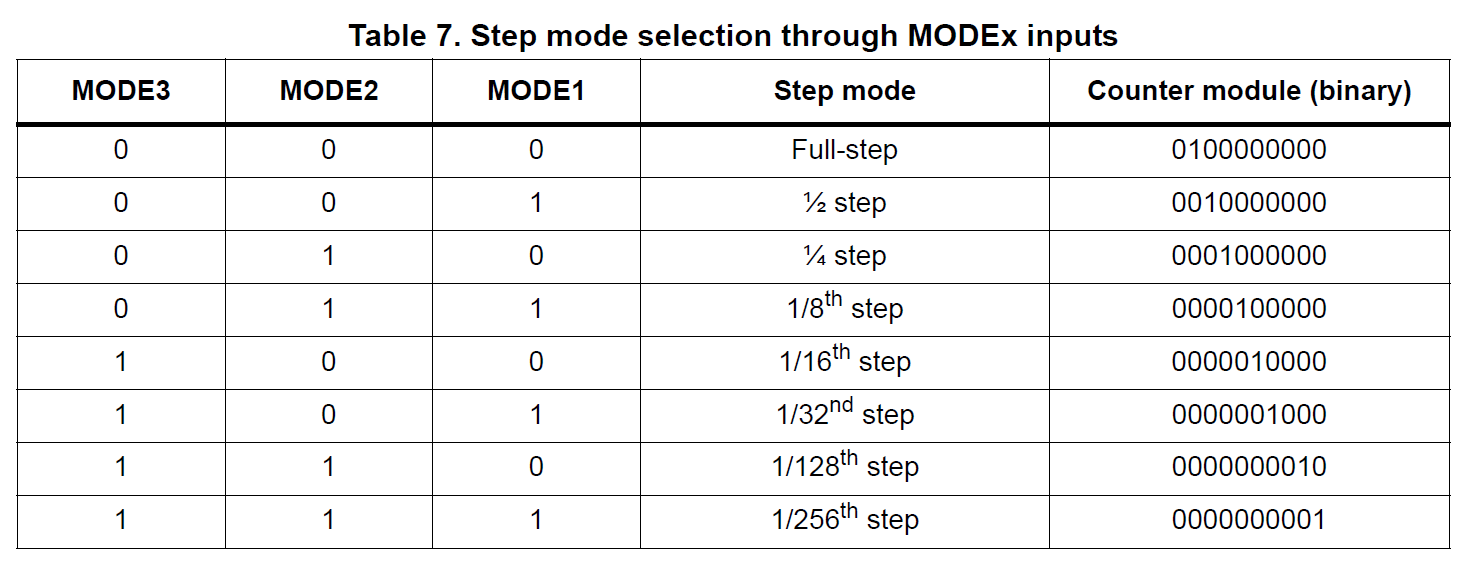
Firmware Guide
Download Vscode + platformio
To compile the firmware , you need to install Visual Studio Code and the platformio pulg-in.
Download firmware
You can download the firmware from https://github.com/FYSETC/Marlin-2.0.x-FYSETC , and if you want to know what we have changed , we recommend to use git to get the code .
The firmware you download is for Cheetah board in default,you need copy the configuration.h & configuration_adv.h from config/Fysetc/AIO_II to the marlin folder.
The latest configurations are in separate repository here, you can download and find the config in config/Fysetc/AIO_II folder
Compile the firmware
Open Vscode and open platformio main page and click the "Open Project" button , and direct to the folder where you put your firmware.
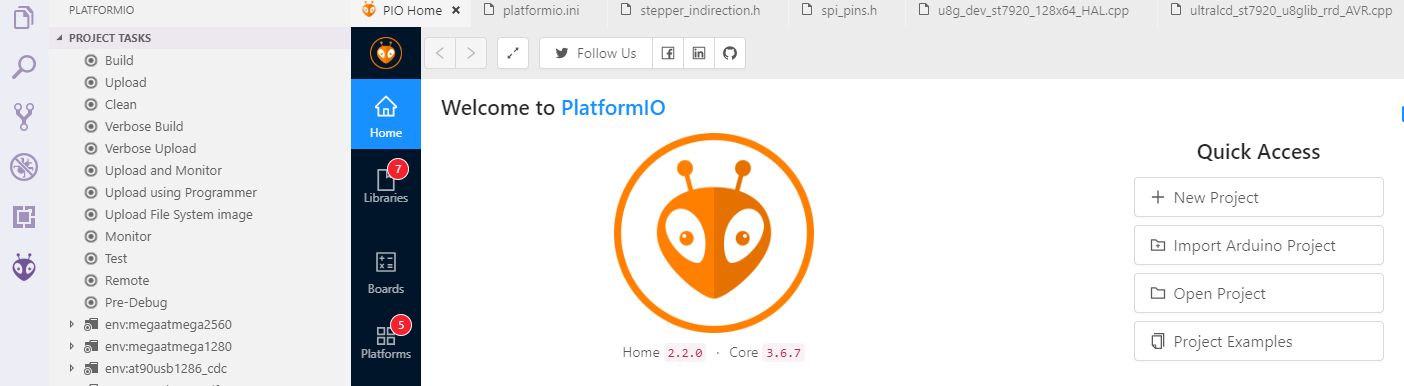
If everything goes fine , at the bottom you can see several buttons

The check mark is for compiling .
Open platformio.ini file and change the option default_envs as below.
default_envs = fysetc_STM32F1
And then replace the default configuration.h and configuration_adv.h with files locate in FIRMWARE_LOCATE\Marlin\Marlin\config\examples\FYSETC according to your board.
Then click check mark to compile.
If you can't generate the hex file, you may need to open vscode using Administrator Account .
For more detail information,you can refer to http://marlinfw.org/docs/basics/install_platformio.html
Upload the firmware(windows,linux,Mac)
We provide several ways to upload the firmware .You can just click the upload button to upload the firmware or refer to the two methods below.
Upload the firmware(windows)
After compiling , you should see the firmware file "firmware.hex" in the folder FIRMWARE_LOCATE\Marlin\Marlin\.pioenvs\fysetc_STM32F1\
Download the flash software in our github https://github.com/FYSETC/STM32Flasher
Connect the board and your pc with USB cable (This step should before you open the software)
Double the click "FlyMcu.exe" software to open it.
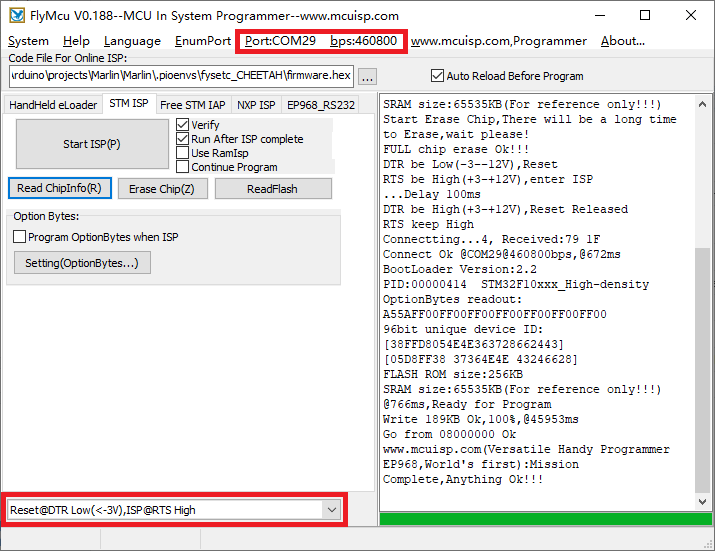
- Select "Reset@DTR low(<-3v),ISP @RTS High"
- Click "Port" to select the port of your USB
- Select FIRMWARE_LOCATE\Marlin\Marlin\.pioenvs\fysetc_STM32F1\firmware.hex as the screenshot shows.
- At last ,click the "Start ISP(p)" to upload the firmware.
Upload the firmware(linux)
Load usb driver
Delete the old version driver /lib/modules/$(uname -r)/kernel/drivers/usb/serial/ch341.ko
rm /lib/modules/$(uname -r)/kernel/drivers/usb/serial/ch341.koDownload the CH34x driver(linux version) from our github
https://github.com/FYSETC/CH340-Driver
follow the readme.txt to make and load the driver .
If you want the driver load automatically every time your PC power up. You can copy the ch34x.ko file to
directory /lib/modules/$(uname -r)/kernel/drivers/usb/serial/ , and do
depmod Install stm32flash tool
First get the code
git clone https://git.code.sf.net/p/stm32flash/code stm32flash-codeThen follow the INSTALL file to install the software
Upload the firmware
Connect the motherboard with USB cable and your PC. And do
dmesgAnd you will get message like

the ttyUSB0 is the port to communicate with the motherboard.
And then go the the firmware.hex file location directory and do the follow command to upload the firmware
stm32flash -w firmware.hex -v -i rts,-dtr /dev/ttyUSB0Attachments
Where to Buy
Tech Support
For some reason,, we have to access Facebook via VPN...so our engineers can't reply to your question on Facebook in time, if possible, please ask questions in the forum.
Please submit any technical issue into our forum .
Updated on: 03/08/2026
Thank you!