M36_HUB_V1
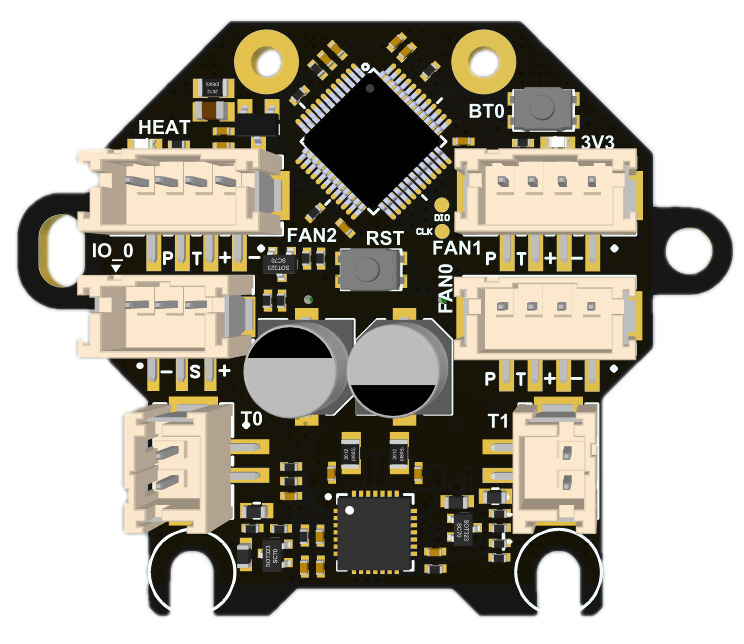
1. Introduction
The M36 hub board is specially designed for use with 36 circular stepper motors (Nema14) and can be used on mini Stealthburner or other print heads using 36 motors. This board can be used with a variety of motherboards, especially our catalyst and BullAnt. With special connection cables, it can also be adapted to any other system using klipper.
M36 is divided into two versions, mainly because of the difference in motor driver chips. The normal version is TMC2209, used with Catalyst motherboard; the Lite version is GC6609, used with BullAnt motherboard.
1.1 Features
- Based on STM32F072
- USB interface or CAN(need addon board)
- Onboard TMC2209 / GC6609 (Lite Version)
- 3 x 4Pin(2pin/3pin compatible) controlled Fans (default VIN power supply, 5V optional)
- 1x signal input / output interface (default 5V power supply, VIN optional , with level shift)
- 2x signal input and output interface (3.3V power supply, with 10K pull-up resistor,without level shift)
- 2X 5V single wire RGB interface (1A MAX)
- 1x 3A MAX PWM output for heating rod
- 2x ADC interface for heating temperature or other needs
- 1x onboard thermistor for board temperature or champer temperature monitor
- Comes with 250mm 4-core cable
- 24V/7A max Power Supply
- Comes with terminal housing and wire crimping tabs
- Onboard ADXL345
2. Hardware Guide
2.1 Install
2.2 Connectors
Connector name | Type | Details |
|---|---|---|
IO_0 | PH2.0-3P | PB5,for input and output, with level shift, hardware pull-up 10k resistor to 3.3v with 100R series resistor. |
IO_12 | SH1.0-6P | 1=PB6,2=PB7, for input and output, hardware pull-up 10k resistor to 3.3v with 100R series resistor. |
MOTOR | PH2.0-4P | TMC2209 / GC6609 |
INPUT | 0.5mm 2x16 BTB connector | Max 24v 7A input, CAN_TX/USBPM=PA12, CAN_RX/USBDM=PA11 |
T0 | PH2.0-2P | PA0,ADC,4.7K pull-up to 3.3V |
T1 | PH2.0-2P | PA3,ADC,4.7K pull-up to 3.3V |
TB | no connector | PA2,ADC,4.7K pull-up to 3.3V, onboard 100K /3950 thermistor |
HEAT | XH2.54-2P | PA8,MAX 3A,PWM output,max power recommended: 24V/70W |
FAN0 | PH2.0-2P | Enable: PB11, (4pin fan = enable, 2pin/3pin fan = PWM control pin) |
FAN1 | PH2.0-4P | Enable: PB4, (4pin fan = enable, 2pin/3pin fan = PWM control pin) |
FAN2 | PH2.0-4P | Enable: PB9, (4pin fan = enable, 2pin/3pin fan = PWM control pin) |
RGB1 | SH1.0-4P | PB13,1A MAX sigal line RGB port, 5V,for NeoPixel, WS2812 |
RGB2 | SH1.0-4P | PB0, 1A MAX sigal line RGB port, 5V,for NeoPixel, WS2812 |
2.3 Wiring
2.3.1 With Bullant
2.3.2 With Catalyst V1
2.3.3 With Catalyst V2
2.3.4 With Spider and Raspberry Pi
2.4 SCH DXF STEP
Get SCH, DXF, STEP files on github:
3. Firmware Guide
This is only Klipper firmware support. If you are Klipper beginner please check the Klipper firmware build here: Installation - Klipper documentation
3.1 Firmware Update
- Turn on the power of the machine and wait for CM68 to start completely, which will take approximately 30-90s.
- Press and hold the BT0 button on the M6 without releasing it. Press and hold the RST button for more than 2 seconds and release it. Wait for 3 seconds and release the BT0 button;
- Enter "lsusb" in the SSH interface and you should see the DFU device appear;
- "cd klipper" enters the klipper directory
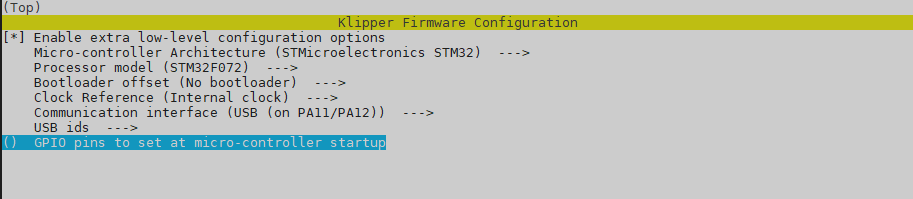
- "make menuconfig" configure the firmware, as shown below:
- "make flash FLASH_DEVICE=0483:df11" to compile and upload;
- When you see the word "successfully", it means the programming is successful.
3.3
- 打开机器电源,等待CM68完全启动,大致需要30-90s。
- 按住M6上的BT0按钮不松开,按住RST按键2秒以上松开,等待3S,松开BT0按钮;
- 在SSH界面输入 ‘lsusb‘ 你应该能看到 DFU 设备出现;
- ‘cd klipper ’进入klipper目录
- ‘make menuconfig’ 进行固件配置,如下图:
- make flash FLASH_DEVICE=0483:df11 进行编译并烧录;
- 当看到successfully字样的时候表示烧录成功。
3.2 Config
We put the Klipper configuration file in github, you need to get the DEVICE ID by "ls /dev/serial/by-id", then replace the id in the config file.
On Catalyst and Bull Ant motherboards, the USB path is used by default for connection, and an ID is no longer required. In theory, it can be used after updating the firmware and restarting.
Attachments
Buy
Contacts
QQ: 1041794121
Facebook group:https://www.facebook.com/groups/197476557529090
Discord:https://discord.gg/Fb6FdND4
email:support@fysetc.com
Updated on: 03/08/2026
Thank you!